Tonight Joel picked homemade pizza. I found this pizza crust on line and we all love it. I admit this post is a copy and paste. Much easier than typing it all.
Things I do with this recipe-
- I add garlic salt, oregano, basil and a little Parmesan to the crust before mixing it up. I do use the beer like they suggest too.
A nifty checklist for you:
FLOUR
WATER
OLIVE OIL
DRY YEAST
SALT
TOMATO SAUCE
OREGANO (AND OTHER SPICES TO YOUR LIKING)
WHATEVER TOPPINGS YOU DESIRE
Making the Dough
You can do this the night before.
You can do this the night before.
The first step in the process is making the dough. Sure, you can pick up a kit if you’d like, but it’s about the same amount of effort in the kitchen (and notably cheaper) to just do it yourself from scratch, plus you don’t have to worry about remembering the kit.
Here’s what you need:
3 cups flour
1 cup water (or other liquid – see below)
2 tablespoons olive oil
1 teaspoon dry yeast
1 teaspoon salt
1 cup water (or other liquid – see below)
2 tablespoons olive oil
1 teaspoon dry yeast
1 teaspoon salt
PIZZA TIP #1 INSTEAD OF USING WATER, I OFTEN LIKE TO SUBSTITUTE ABOUT TWO-THIRDS OF A BOTTLE OF BEER FOR THE WATER. IT ADDS A GREAT FLAVOR, COLOR, AND AROMA TO THE CRUST.
First thing – warm up the water (or other liquid) in the microwave until it’s nice and warm to the touch – not scalding, but not room temperature, either. Then simply drop all of the ingredients into a mixing bowl.
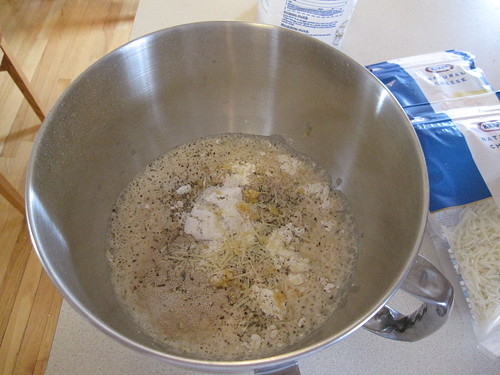
PIZZA TIP #2 ADD SOME ADDITIONAL FLAVOR TO THE CRUST BY ADDING IN SOME OPTIONAL ITEMS BEFORE YOU BEGIN MIXING THE DOUGH. THINGS I ENJOY ADDING INCLUDE OREGANO, BLACK PEPPER, RED PEPPER FLAKES, PARMESAN CHEESE, GARLIC, BASIL, PARSLEY, ONION POWDER, AND ROSEMARY.
All you have to do is mix this up until it begins to form a ball. It’s much easier to do this with a stand mixer, which I’m lucky enough to have:
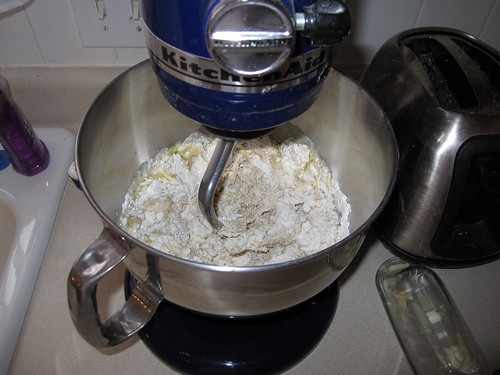
In the end, you want a ball of dough that’s just barely sticky, but not sticky enough to actually leave any residue on your hands. If it’s not sticky at all, add a tablespoon of water and mix it some more. If it’s too sticky, add a tablespoon or two of flour and mix some more.
Once you have the ball, knead it a bit with your hands. Smell it. You can add more flavorful additions if you want as long as you work them into the dough right now. Here’s what my ball looks like.

Then, when you’re satisfied (and ready to simply eat the dough right now), put it back into the bowl and let it rest in a warm, dark place for an hour or so. I usually let my dough rest on the stovetop with a towel over the top:
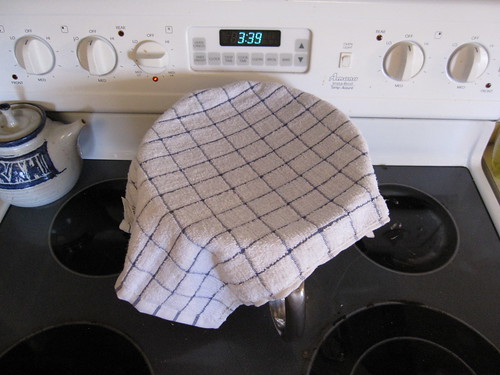
If you’re preparing the crust the night before, instead of letting the dough rise in a bowl, pat some flour on the outside of the dough ball (to keep it from sticking) and wrap the dough in Saran Wrap or a Ziploc bag with air sucked out and put it in the fridge. It will raise very slowly overnight and be perfect in the morning.
Preparing the Crust
You can do this the morning before.
You can do this the morning before.
One big step many people skip in the pizza-making process is pre-baking the pizza crust. Baking your crust in the oven for six minutes or so before putting on toppings prevents the dreaded “doughy crust” that often is the downfall of an otherwise delicious homemade pizza.
So, preheat the oven to 425 F, get out your pizza pan or cookie sheet (I actually just use a big cookie sheet), sprinkle a healthy dose of flour all over it (or use a cooking spray like Pam if you prefer), then spread out the dough over the pan. If you want, you can toss the dough, but I often mess up the dough when I do that, so I usually just stretch it as much as I can in my hands before I put it down.
I then spread it to the edge of the pan, then roll it back just a bit to form a crust edge, like this:
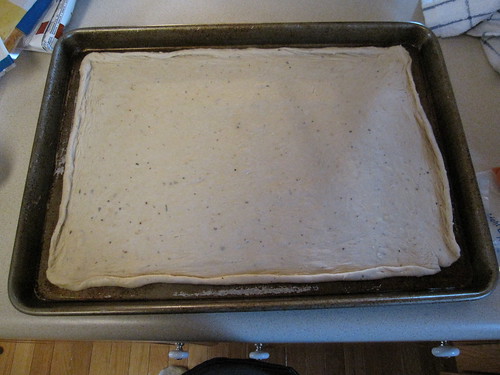
Then, just toss the crust into the oven and bake it for six minutes or so. When it’s done, there will be a few bubbles – just pop them with a fork. You can then put the crust in the refrigerator if you baked it in the morning.
Making the Sauce
You can do this the morning before.
You can do this the morning before.
Another thing people often do that’s a big waste of money for pizza is buying a jar of sauce from the store. For less than a dollar, you can make an awesome sauce at home.
It’s easy – just open up a can of tomato sauce, pour it in a bowl, and start jazzing it up. If you use nothing else at all, use a minimum of half a teaspoon of salt, half a teaspoon of oregano, and a quarter teaspoon of black pepper.
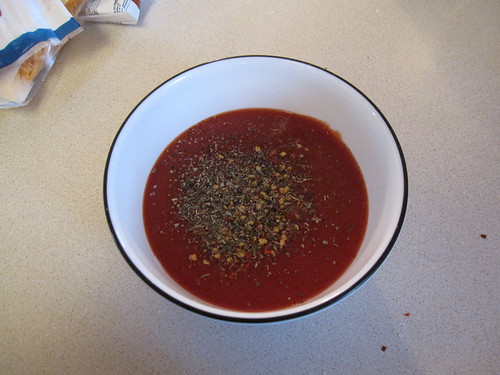
However, I strongly encourage you to experiment. Try more oregano, more black pepper, red pepper flakes, parmesan cheese, garlic, basil, parsley, onion powder, or rosemary. Add some of everything you like, stir it, taste it, then add some more. Don’t be afraid to play around.
Once you’re happy, you can store the sauce in the refrigerator all day – or you can go right ahead and start assembling the pizza.
Assembling and Baking the Pizza
You have the crust done. You have the sauce ready to go. Now comes the fun part – assembling and baking the pizza.
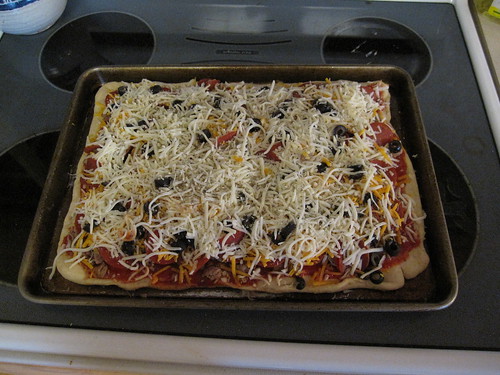
I tend to layer things as much as possible – sauce, then toppings, then cheese, then a bit more sauce, then more toppings, then more cheese. You can do whatever you like, of course, but I do recommend having a bit of sauce on the bottom to hold the crust to the toppings.
The best part about the toppings is that the kids can get involved. My son can spread sauce, sprinkle cheese, and toss on toppings – and even my one year old daughter can help a bit.
PIZZA TIP #3 WHEN YOU’RE FINISHED ASSEMBLING THE PIZZA, SPRINKLE SOME OREGANO ON TOP OF THE CHEESE JUST BEFORE YOU TOSS IT IN THE OVEN. IT BRINGS OUT THE FLAVOR OF THE CHEESE LIKE NOTHING ELSE.
Here’s my assembled pizza:
I bake pizzas in the oven at 400 F for about sixteen minutes, then check them to see how done they are. Depending on the amount of toppings (and whether the crust was cold to begin with), I may have to add a few minutes to the baking time.
Here’s the finished pizza…
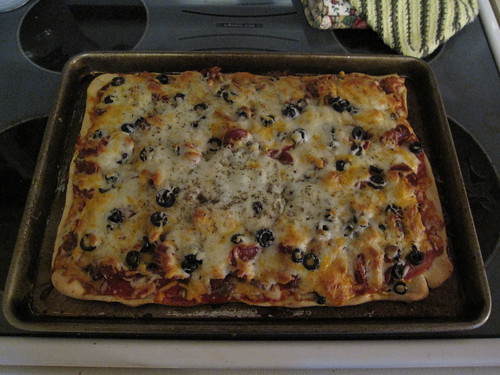
… and all that’s left is to slice it up!
WE JUST LOVE IT !!!!!
I am so trying this when I get off my fast!!!!
ReplyDeleteI have never made my own dough, but this sounds really doable! Thanks for the recipe!
ReplyDelete